Minitutorial: Creating a title slide from a portrait image
Back in January I promised I would do a tutorial on how to turn a portrait image into a full side slide. Well I can't start a series on tables without first doing that tutorial. Let's get started.
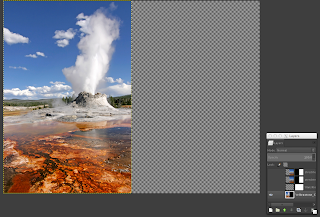
The "problem" is simple, you have an image with the right height of a slide, the the width is not enough. In the case of a 1024 × 768 slide, some images come in the 512 × 768 size, so what to do with the other half? Case in point,
I would like to use this image taken from Wikimedia commons, but what to do with the other half? The result that I what to go is this
With would give me white space and a sense of continuity that I really like. SO that's what we are going to do, makeover Figure 1 into Figure 2. The trick is simple, (1) we crop some pixels from Figure's 1 right border, (2) stretch it to cover the rest of slide, and (3) blur it. There is pre-processing and some pos-processing however.
1. Open the original image in the Gimp or Photoshop and resize the canvas (Image menu -> Scale Image) to have the same width of the slide. I have already done this in Figure 1.
2. Make a rectangular selection of approximately 20 pixels (see Figure 3)
3. Open the Layer dialog (Ctrl-L)
4. Copy the selection (Ctrl-C)
5. Paste it into a new transparent layer by clicking on the left-most button on the bottom of the Layer Dialog.
6. Move to the layer you just created and stretch that selection (Layer Menu -> Scale Layer) to 532 pixels (see Figure 4). 532 = 1024 - 512 + 20. 1024 is the slide's width, 512 is the image's width, and 20 the width of the selection.
7. Now move the stretched selection all the way to the right, so that the slide's right border and the stretched image's right border are the same.
8. Blur "step 7" (Filter Menu -> Gaussian Blur) by 10 pixels.
There you go! You have arrived at the result.
As you can the change between the two images is abrupt. We can soften it to get a nice continuity, something like this
For that purpose you need to add a layer mask to the stretched image. The figure below shows this mask
If you compare it with Figure 4, you would see that the black-to-white gradient is located at the same place of the original border selection.
The "problem" is simple, you have an image with the right height of a slide, the the width is not enough. In the case of a 1024 × 768 slide, some images come in the 512 × 768 size, so what to do with the other half? Case in point,
 |
| Figure 1: Original portrait image. |
 |
| Figure 2: turning Figure 1 into a full side slide |
1. Open the original image in the Gimp or Photoshop and resize the canvas (Image menu -> Scale Image) to have the same width of the slide. I have already done this in Figure 1.
 |
| Figure 3. Selection of 20 pixels on the right border |
3. Open the Layer dialog (Ctrl-L)
4. Copy the selection (Ctrl-C)
5. Paste it into a new transparent layer by clicking on the left-most button on the bottom of the Layer Dialog.
6. Move to the layer you just created and stretch that selection (Layer Menu -> Scale Layer) to 532 pixels (see Figure 4). 532 = 1024 - 512 + 20. 1024 is the slide's width, 512 is the image's width, and 20 the width of the selection.
 |
| Figure 4, Stretching the border selection |
8. Blur "step 7" (Filter Menu -> Gaussian Blur) by 10 pixels.
There you go! You have arrived at the result.
One more thing
Let's examine the interface between the original image and the stretched and blurred one.As you can the change between the two images is abrupt. We can soften it to get a nice continuity, something like this
For that purpose you need to add a layer mask to the stretched image. The figure below shows this mask
If you compare it with Figure 4, you would see that the black-to-white gradient is located at the same place of the original border selection.


Comments
Post a Comment